This is a continuation of the blog post “What is a Pivot Table“.
In my last blog post I skipped over the options in the ‘Create PivotTable’ dialog box. Let’s see what you can do there. Why on earth did Microsoft create that one extra step when inserting a Pivot Table (PT)?

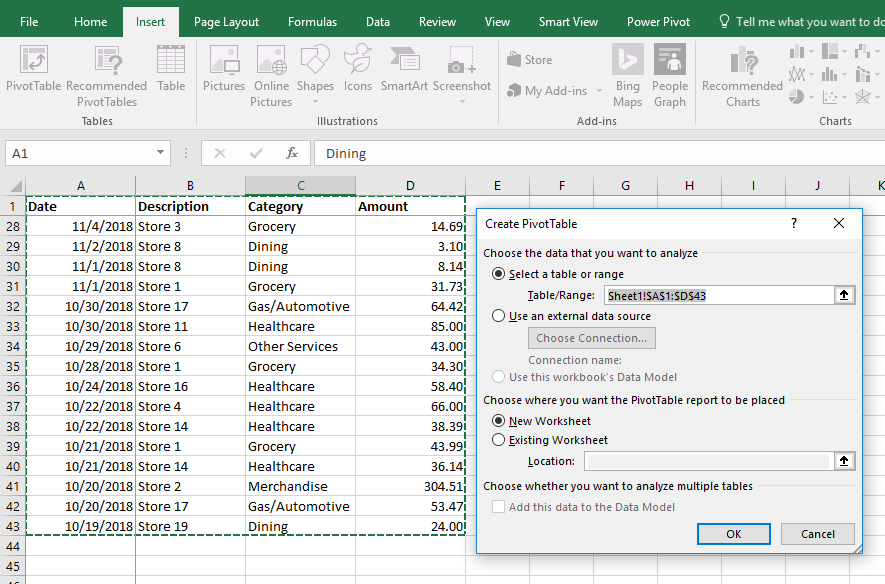
First half of the ‘Create PivotTable’ dialog box is about the source of data for your report:
1. It gives you a hint what data is being added to the PTPivot Table. If the dotted box does not cover all your data or is covering bigger area than you need, you can always edit the field ‘Table/Range’. You can delete the pre-populated data and select the range of cells with your mouse. Also, you can select a range in another Excel
WBworkbook.
2. You have an option to choose an external source. This allows you to use Excel PTPivot Table functionality fed by data outside of Excel. There are cases when data sits in an external database. It also allows the user to (i) keep Excel WBworkbook size under control and (ii) avoid the repetitive import of data each time it gets updated.
3. This option is there for when your Excel WBworkbook has a ‘Data Model’. I will cover ‘Data models’ in another blog post. In short your PTPivot Table can get data from multiple connected tables.
Second half of the ‘Create PivotTable’ dialog box is about where to place the report:
1. By default it offers to insert a new WSworksheet. This is most used option because very rarely does one have enough space in the current WSworksheet for both data and the report.
2. When there is enough space and you know exactly the final shape of your PTPivot Table, choose this option and select the cell where to put your PTPivot Table. Please note that down and to the right of your newly created PTPivot Table there must be no populated cells. Your PTPivot Table will expand only down and to the right as you add fields and create the report you need. If there is any cell with text or data and your PTPivot Table will overlap it, PTPivot Table will give you a warning that that data is going to be overwritten.
3. This option can be checked when you want the data selected in the field ‘Table/Range’ to be added to the ‘Data Model’. Again, we’ll talk about it in another blog post.


